ICE CUBE PRESENTATION
FIRST TEST OF FREEZING MY PHOTOGRAPHS:
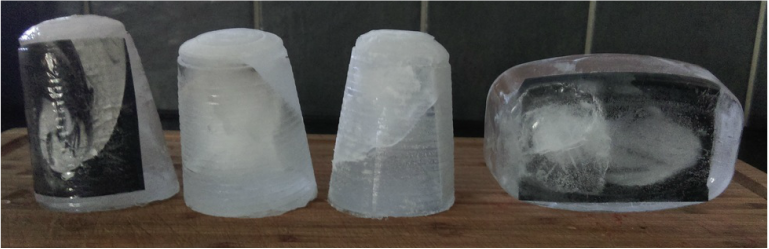
For the presentation of this unit, I wanted to solidify my photographs within water, I have experimented with freezing my photographs in plastic cups and tupperware pots of both distilled water and tap water to find the most effective method.

|
TAP WATER: PHOTOGRAPH AT THE FRONT
For my first test, I used one of my 'twirl' images and i pushed it to the front of a plastic cup and filled it with tap water. I then placed the cup in the freezer overnight until it solidified. |

|
DISTILLED WATER: PHOTOGRAPH AT THE BACK
|
FINAL ICE CUBE MELT
EQUIPMENT
Tripod
Nikon DSLR D3100
One Spotlight
White Umbrella
A empty locker
Portable fan heater
Freezer
3 small plastic containers
3 photograph printed on photo paper (to fit in the containers)
METHOD
To prepare for this shoot, I filled three small cube containers with tap water, I then let my three (pre-cut to fit) twirl images float in the containers. The intention of this is to create a trisector of photographs frozen within ice cubes. Whilst the images were freezing, I set up my shoot, I used an empty, black locker as a backdrop because the cube shape reflected the shape of my ice cubes and gave a plain background colour. I placed my Nikon DSLR on a tripod directly in front of the open locker, I decided o use a tripod so that the clips would be steady and would avoid the shaking of my hands. Next, I placed a spotlight above my camera, directed into the locker however, I attached the white umbrella to diffuse the light to make it less direct. Finally, I placed the fan heater next to the locker to speed up the melting process. When carrying out this shoot I had to be conscious of safety and ensure that none of the electrics would be in range of dripping water once the ice had melted.
Once my ice cubes had frozen, I removed them from their containers and placed them in a row in the centre of the locker. I had to be quick to focus my camera and ensure that my lighting was alright as it was a hot day and my ice cubes were melting quickly. I set the ice cubes, allowing space in front of them for the pool of water that would gradually spread out. I then turned on the heater and began filming.
When shooting this video I faced many difficulties, firstly, my camera kept running out of battery and memory, meaning that there were gaps in my footage. Secondly, I found that the ice cube closest to the heater melted aa lot more rapidly than the other two and as it melted it lost stability and fell over (meaning that the photograph could no longer be seen). To overcome this I tried to regularly change the position of the heater but it was difficult to achieve an even melting rate on all sides. As a result, if I was to exhibit my work I would leave the ice cubes to melt at room temperature rather than attempt to speed up the process.
To add to this, if i was to redo this photo shoot, I would set it up on a more stable flooring as the one that I used moved when people walked past meaning that when I watched the footage back, the camera became unsteady whenever anyone around it moved.
